Web Stack Implementation (lemp Stack)
Linux, Nginx, MariaDB (MySQL), and PHP
Table of contents
- Step 0 – Preparing prerequisites
- Creating Our EC2 Instance
- Step 1 – INSTALLING THE NGINX WEB SERVER
- Step 2 — INSTALLING MYSQL
- Step 3 — INSTALLING PHP
- Step 4 — CONFIGURING NGINX TO USE PHP PROCESSOR
- Step 5 – TESTING PHP WITH NGINX
- Step 6 – RETRIEVING DATA FROM MYSQL DATABASE WITH PHP (CONTINUED)
- That means your PHP environment is ready to connect and interact with your MySQL server.
- EL FIN!!!
Step 0 – Preparing prerequisites
To complete this project, you will need an AWS account and a virtual server with Ubuntu Server OS. If you do not have one, endeavor to create one here
Creating Our EC2 Instance
Search for EC2 on the search bar, or find it in Services
On the EC2 page, click on the launch instance button
Set the name you want to give your Instance
Select the OS to be used for the project, I selected the Ubuntu server, covered by my free tier account
Choose the Instance Type and key pair. For Instance, I chose the T2 micro(free tier eligible). And I used a pre-existing keypair I created for the LAMP project.
Leave the VPC and Subnet settings on default. Go to the Firewall(Security Group) session.
Create a security group, or use an existing Security Group. For this task, I used the SG I created for the LAMP project, with an inbound rule that allows SSH, HTTP and HTTPS from anywhere.
Click on Launch Instance and launch your Instance.
Go to the Instances page and check if the instance is running, and if the status check has the "2/2 checks passed" sign.
Click on the radio button beside the instance name, a drop-down menu would appear. Copy the public IP to a notepad, we will make use of it when connecting to our instance via putty.
Refer to project1 to see how to connect to your EC2 instance using putty.
Step 1 – INSTALLING THE NGINX WEB SERVER
To display web pages to our site visitors, we are going to use a high-performance web server called Nginx. We’ll use the 'apt' package manager to install this package.
Update your server’s package index. Following that, use 'apt install' to get Nginx installed
sudo apt updatesudo apt install nginxWhen prompted, enter Y to confirm that you want to install Nginx. Once the installation is finished, the Nginx web server will be active and running on your Ubuntu server.
to verify that Nginx is active and running, run the following code:
sudo systemctl status nginx
You should get a message that looks like this
If it's green and running, then you have successfully launched your Nginx web server.
Now it is time for us to test how our Nginx server can respond to requests from the Internet.
- Open a web browser of your choice and type in your public IP address
If you see the following page, then your web server was correctly installed and is accessible.
Step 2 — INSTALLING MYSQL
Now that you have a web server up and running, you need to install a Database Management System (DBMS) to be able to store and manage data for your site in a relational database. MySQL is a popular relational database management system used within PHP environments, so we will use it in our project.
- Use the 'apt' package manager to install MySQL
sudo apt install mysql-server
When prompted, confirm installation by typing Y, and then ENTER.
After installation has been completed, log into the MySQL console by typing
sudo mysql
This will connect to the MySQL server as the administrative database user root, which is inferred by the use of sudo when running this command. You should see an output like this:
It’s recommended that you run a security script that comes pre-installed with MySQL. This script will remove some insecure default settings and lock down access to your database system.
Before running the script, you will set a password for the root user, using mysql_native_password as the default authentication method. We’re defining this user’s password as devops111
ALTER USER 'root'@'localhost' IDENTIFIED WITH mysql_native_password BY 'devops111';
Exit the MySQL shell with: mysql> exit
Start the interactive script by running:
sudo mysql_secure_installationYou would receive a message asking you to validate the password component
You can choose to validate or not, depending on how secure you want your password to be. It checks the strength of a password and allows users to set only passwords that are strong enough.
NOTE: If enabled, passwords that don’t match the specified criteria will be rejected by MySQL with an error. It is safe to leave validation disabled, but you should always use strong, unique passwords for database credentials.When you’re finished, test if you’re able to log in to the MySQL console by typing:
sudo mysql -pTo exit the MySQL console, type:
mysql> exit
Note: At the time of this writing, the native MySQL PHP library mysqlnd doesn’t support caching_sha2_authentication, the default authentication method for MySQL 8. For that reason, when creating database users for PHP applications on MySQL 8, you’ll need to make sure they’re configured to use mysql_native_password instead. We’ll demonstrate how to do that in Step 6.
Your Mysql server is now installed and secure, next, we would install the final component of the LEMP stack. PHP.
Step 3 — INSTALLING PHP
Unlike Apache which embeds the PHP interpreter in each request, Nginx requires an external program to handle PHP processing and act as a bridge between the PHP interpreter itself and the web server. This allows for better overall performance in most PHP-based websites, but it requires additional configuration. You’ll need to install php-fpm, which stands for “PHP fastCGI process manager”, and tells Nginx to pass PHP requests to this software for processing.
Additionally, you’ll need php-mysql, a PHP module that allows PHP to communicate with MySQL-based databases.
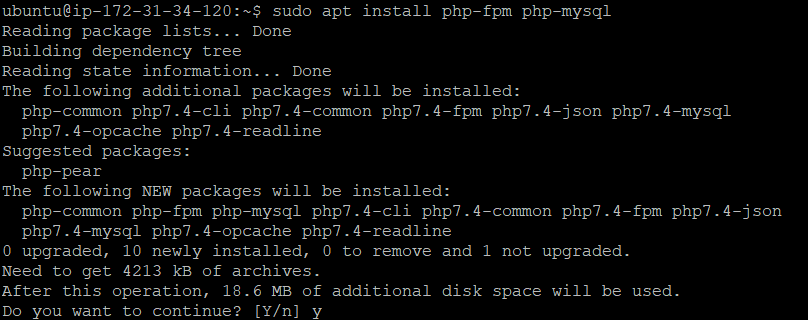
To install these 2 packages at once, run:
sudo apt install php-fpm php-mysql
When prompted, type Y and press ENTER to confirm the installation.
You now have your PHP components installed. Next, you will configure Nginx to use them.
Step 4 — CONFIGURING NGINX TO USE PHP PROCESSOR
With Nginx web server, we can host multiple domains on a single server. By creating server blocks(*similar to virtual hosts in Apache), to encase configuration details.
In this guide, we will use projectlemp as a domain name.
On Ubuntu 20.04, Nginx has one server block enabled by default and is configured to serve documents out of a directory at /var/www/html. This works well for hosting a single site, but it would become a problem when you intend to host multiple sites. Instead of modifying /var/www/html, we’ll create a directory structure within /var/www for your domain website, leaving /var/www/html as the default directory to be served if a client request does not match any other sites.
- Create the root web directory for your domain as follows:
sudo mkdir /var/www/projectlemp
- Assign ownership of the directory with the $USER environment variable, which will reference your current system user:
sudo chown -R $USER:$USER /var/www/projectlemp
- Open a new configuration file on Nginx's sites-available directory using your preferred text editor. I would be using nano:
sudo nano /etc/nginx/sites-available/projectlemp
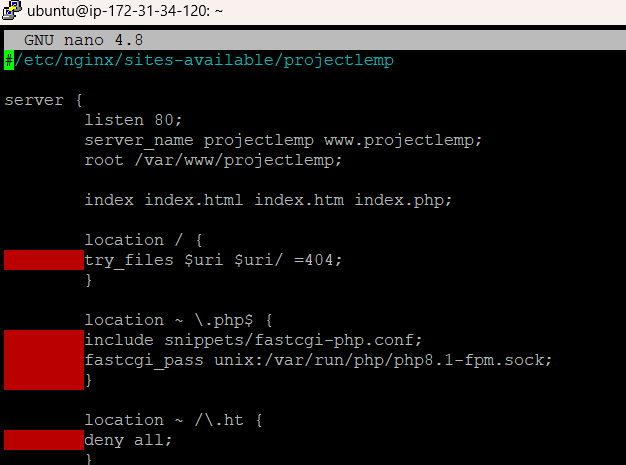
This will create a blank line, post the following bare-bones configuration:
#/etc/nginx/sites-available/projectlemp
server { listen 80; server_name projectlemp www.projectlemp;
root /var/www/projectlemp;index index.html index.htm index.php; location / { try_files $uri $uri/ =404; } location ~ \.php$ { include snippets/fastcgi-php.conf; fastcgi_pass unix:/var/run/php/php8.1-fpm.sock; } location ~ /\.ht { deny all; }}
Here's what each of the directives and location blocks does:
listen: This defines the port Nginx will listen on. In this case, it will listen on port 80, the default port for HTTP.
root: This defines the root of the document, where the files served by this server are stored.
index: This defines the order in which Nginx will prioritize index files for this website.
server_name: Defines which domain names and/or IP addresses this server block should respond for. Point this directive to your server’s domain name or public IP address.
location /: The first location block includes a try_files directive, which checks for the existence of files or directories matching a URI request. If Nginx cannot find the appropriate resource, it will return a 404 error.
location ~ .php$: This location block handles the actual PHP processing by pointing Nginx to the fastcgi-php.conf configuration file and the php7.4-fpm.sock file, which declares what socket is associated with php-fpm.
location ~ /.ht: The last location block deals with .htaccess files, which Nginx does not process. By adding the
deny alldirective, if any .htaccess files happen to find their way into the document root, they will not be served to visitors.
When you're done editing the document, save and close the nano file by typingCTRL + X and then Y and ENTER to confirm.
- Activate your configuration by linking to the config file from Nginx's "sites-enabled" directory:
sudo ln -s /etc/nginx/sites-available/projectlemp /etc/nginx/sites-enabled/
This would tell Nginx to use the configuration next time it is reloaded. You can test your configuration for syntax errors by typing: sudo nginx -t
You should see the following message:
If any errors are reported, return to the configuration page to review its contents before continuing.
Disable the default Nginx host that is currently configured to listen on port 80, by typing the following command:
sudo unlink /etc/nginx/sites-enabled/defaultWhen you are done, reload Nginx to apply the changes:
sudo systemctl reload nginx
Congratulations, your new server is active, but the web root /var/www/projectlemp is still empty. Create an index.html file in that location, to test that the new server block works as expected:
sudo echo 'Hello lemp from hostname' $(curl -s http://169.254.169.254/latest/meta-data/public-hostname) 'with public IP' $(curl -s http://169.254.169.254/latest/meta-data/public-ipv4) > /var/www/projectlemp/index.html
Go to your browser and open your website using your public IP address:

If you see the text from the "echo" command you wrote to the index.html file, then it means your Nginx site is working as expected.
You can leave this file in place as a temporary landing page for your application until you set up an index.php file to replace it. Once you do that, remember to remove or rename the index.html file from your document root, as it would take precedence over an index.php file by default.
Step 5 – TESTING PHP WITH NGINX
At this stage, your LEMP stack is completely installed and fully operational. You can test it to ensure that Nginx can accurately hand .php files off to your processor.
This can be done by creating a test PHP file in your document root.
- Open a new file called info.php within your document root in your text editor:
sudo nano /var/www/projectlemp/info.php
- Type the following lines into the new file:
<?php phpinfo();
This is a valid PHP code that will return information about your server.
You can now access this page in your web browser by visiting your public IP address, followed by /info.php:
<Public IP>/info.php
You will see a web page containing detailed information about your server:
After checking the relevant information about your PHP server through that page, it’s best to remove the file you created as it contains sensitive information about your PHP environment and your Ubuntu server. You can use rm to remove that file:
sudo rm /var/www/projectlemp/info.php
You can always regenerate this file if you need it later.
Step 6 – RETRIEVING DATA FROM MYSQL DATABASE WITH PHP (CONTINUED)
In this step, you will create a test database(DB) with a simple "To-do list" and configure access to it. To enable the Nginx web server query and display data from it.
Create a new user with the "mysql_native_password" authentication method, to be connected to the MySQL database from PHP.
Create a database and a user of your choice. For the sake of this project, we would be creating a database named example_database and a user named example_user*.*
First, connect to the MySQL console using the root account:
sudo mysql -p
To create a new database, run the following command from your MySQL console:
The following command creates a new user named example_user, using mysql_native_password as the default authentication method. We're defining this user's password as 'password', but you should replace it with a secure password of your choosing.
CREATE USER 'example_user'@'%' IDENTIFIED WITH mysql_native_password BY 'password';
Now we need to give the user permission over the example_database:
mysql> GRANT ALL ON example_database.* TO 'example_user'@'%';
This will give the example_user user full privileges over the example_database database, while preventing this user from creating or modifying other databases on your server
- Exit the MySQL shell with
mysql> exit
You can test if the new user has the proper permissions by logging in to the MySQL console again, this time using the custom user credentials: mysql -u example_user -p
Notice the -p flag in this command, which will prompt you for the password used when creating the example_user user. After logging in to the MySQL console, confirm that you have access to the example_database database:mysql> SHOW DATABASES;
This will give you the following output:
- Next, we’ll create a test table named todo_list. From the MySQL console, run the following statement:
CREATE TABLE example_database.todo_list ( item_id INT AUTO_INCREMENT, content VARCHAR(255), PRIMARY KEY(item_id) );
Insert a few rows of content in the test table. You might want to repeat the next command a few times, using different VALUES:
mysql> INSERT INTO example_database.todo_list (content) VALUES ("My first important item");
To confirm that the data was successfully saved to your table, run:
mysql> SELECT * FROM example_database.todo_list;
You'll see the following output:
- After confirming that you have valid data in your test table, you can exit the MySQL console:
mysql> exit
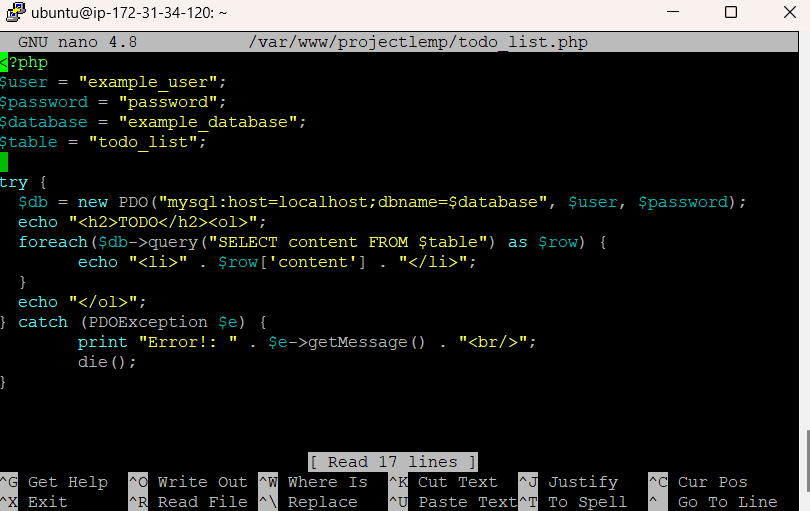
Now you can create a PHP script that will connect to MySQL and query for your content. Create a new PHP file in your custom web root directory using your preferred editor. We’ll use nano for that:nano /var/www/projectlemp/todo_list.php
The following PHP script connects to the MySQL database and queries for the content of the todo_list table, displaying the results in a list. If there is a problem with the database connection, it will throw an exception. Copy this content into your todo_list.php script:
Save and close the file when you are done editing.
You can now access this page in your web browser by visiting the domain name or public IP address configured for your website, followed by /todo_list.php:
3.134.96.166/todo_list.php
You should see a page like this, showing the content you've inserted in your table.
