

Table of contents
- Three-tier Architecture
- Your 3-Tier Setup
- LAUNCH AN EC2 INSTANCE THAT WILL SERVE AS A “WEB SERVER”
- Step 1 - Prepare a web server
- UPDATE THE /ETC/FSTAB FILE
- Step 2 - Prepare the Database Server
- Step 3 — Install WordPress on your Web Server EC2
- Step 4 — Install MySQL on your DB Server EC2
- Step 5 — Configure DB to work with WordPress
- Step 6 — Configure WordPress to connect to the remote database
- CONGRATULATIONS!!!
You are progressing in practicing implementing web solutions using different technologies. As a DevOps engineer you will most probably encounter PHP-based solutions since, even in 2021, it is the dominant web programming language used by more websites than any other programming language. In this project, you will be tasked to prepare storage infrastructure on two Linux servers and implement a basic web solution using WordPress. WordPress is a free and open-source content management system written in PHP and paired with MySQL or MariaDB as its backend Relational Database Management System (RDBMS).
Project 6 consists of two parts:
Configure storage subsystem for Web and Database servers based on Linux OS. The focus of this part is to give you practical experience in working with disks, partitions and volumes in Linux.
Install WordPress and connect it to a remote MySQL database server. This part of the project will solidify your skills in deploying Web and DB tiers of Web solutions.
As a DevOps engineer, your deep understanding of the core components of web solutions and your ability to troubleshoot them will play an essential role in your further progress and development.
Three-tier Architecture
Generally, web or mobile solutions are implemented based on what is called the Three-tier Architecture. Three-tier Architecture is a client-server software architecture pattern that comprises 3 separate layers. Namely: The presentation layer, the Business layer and the data Access or Management Layer(DAL).

Presentation Layer (PL): This is the user interface such as the client-server or browser on your laptop.
Business Layer (BL): This is the backend program that implements business logic. Application or Webserver
Data Access or Management Layer (DAL): This is the layer for computer data storage and data access. Database Server or File System Server such as FTP server, or NFS Server.
In this project, you will have the hands-on experience that showcases Three-tier Architecture while also ensuring that the disk used to store files on the Linux servers is adequately partitioned and managed through programs such as gdisk and LVM respectively. You will be working with several storage and disk management concepts, to have a better understanding, watch the following video:
Disk management in Linux
Note We are gradually introducing new AWS elements into our solutions, but do not be worried if you do not fully understand AWS Cloud Services yet, there are Cloud-focused projects ahead where we will get into deep details of various Cloud concepts and technologies – not only AWS but other Cloud Service Providers as well.
Your 3-Tier Setup
A Laptop or PC to serve as a client
An EC2 Linux Server as a web server (This is where you will install WordPress)
An EC2 Linux server as a database (DB) server
Use RedHat OS for this project
If you've forgotten how to spin an EC2 instance, please refer to Project 2.
In previous projects we used ‘Ubuntu’, but it is better to be well-versed with various Linux distributions, thus, for this project, we will use a very popular distribution called ‘RedHat’ (it also has a fully compatible derivative – CentOS)
Note: For the Ubuntu server, when connecting to it via SSH/Putty or any other tool, we used an ubuntu user, but for RedHat, you will need to use an ec2−user user. The connection string will look like
ec2-user@<Public-IP>Let us get started!
LAUNCH AN EC2 INSTANCE THAT WILL SERVE AS A “WEB SERVER”
Step 1 - Prepare a web server
- Launch an EC2 instance that will serve as a "Web server". Create 3 volumes in the same AZ as your Web Server EC2, each of 10GB.
Learn How to add an EBS volume to an EC2 instance here
Attach all three volumes one by one to your Web Server EC2 instance
https://user-images.githubusercontent.com/105195327/211216013-97e0006b-8867-4328-bd86-b2b6bbb9a391.mp4Open up the Linux terminal to begin the configuration
Use lsblk command to inspect what block devices are attached to the server.
Notice the names of your newly created devices. All devices in Linux reside in /dev/ directory. Inspect it with ls /dev/ and make sure you see all 3 newly created block devices there – their names will likely be xvdf, xvdh, xvdg.

Use
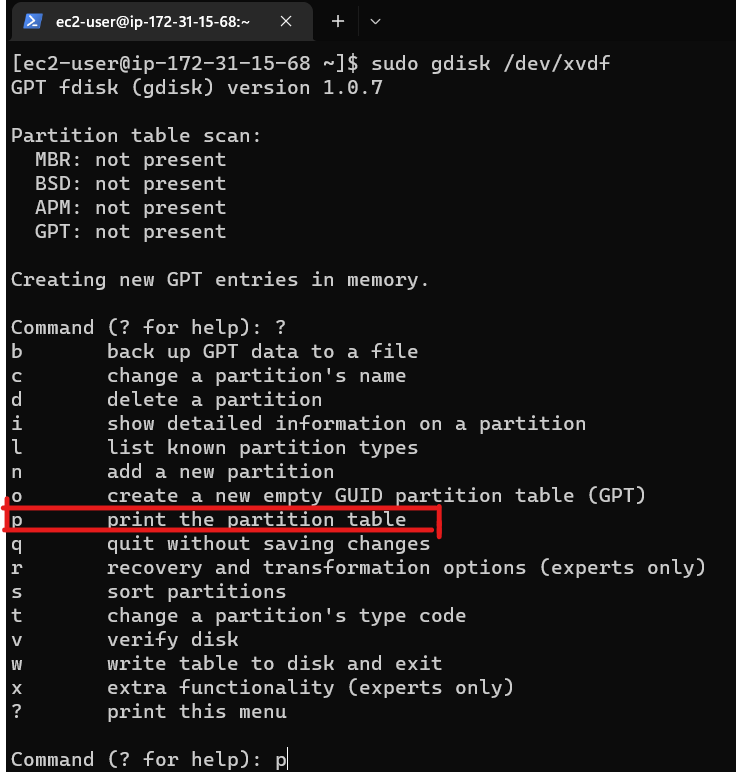
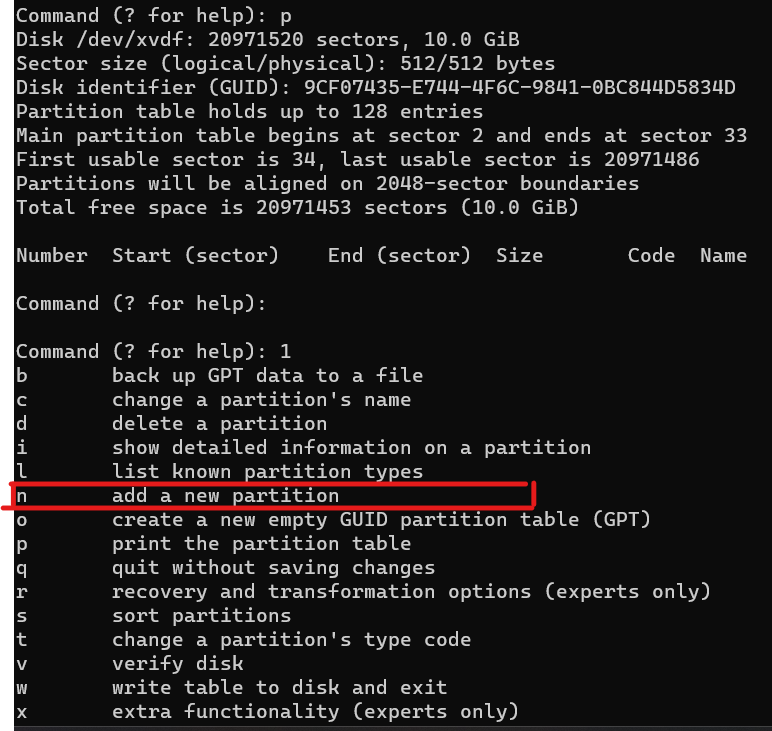
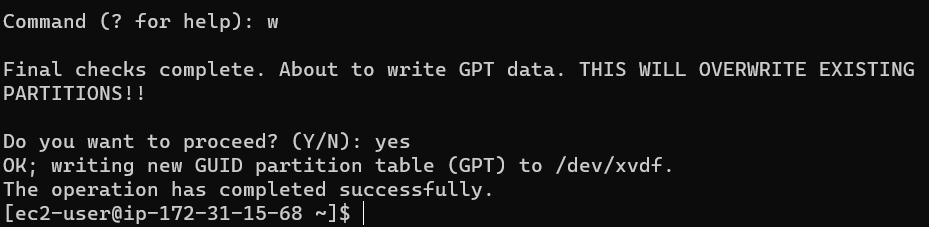
df -hcommand to see all mounts and free space on your serverUse gdisk utility to create a single partition on each of the 3 disks
sudo gdisk /dev/xvdf


Now, do the same for the remaining disks xvdh sudo gdisk /dev/xvdh and xvdg sudo gdisk /dev/xvdg
Use lsblk utility to view the newly configured partition on each of the 3 disks.
Install lvm2 package using
sudo yum install lvm2. Run sudo lvmdiskscan command to check for available partitions.

Note Previously, in Ubuntu we used the
aptcommand to install packages, in RedHat/CentOS a different package manager is used, so we shall use yum command instead.
- Use pvcreate utility to mark each of the 3 disks as physical volumes (PVs) to be used by LVM.
sudo pvcreate /dev/xvdf1
sudo pvcreate /dev/xvdg1
sudo pvcreate /dev/xvdh1

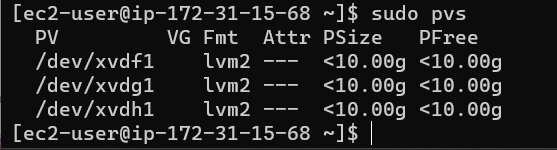
- Verify that your Physical volume has been created successfully by running sudo pvs
Use vgcreate utility to add all 3 PVs to a volume group (VG). Name the VG webdata-vg
sudo vgcreate webdata-vg /dev/xvdh1 /dev/xvdg1 /dev/xvdf1Verify that your VG has been created successfully by running sudo vgs

- Use lvcreate utility to create 2 logical volumes. apps-lv (Use half of the PV size), and logs-lv Use the remaining space of the PV size.
NOTE apps-lv will be used to store data for the Website while, logs-lv will be used to store data for logs.
sudo lvcreate -n apps-lv -L 14G webdata-vgsudo lvcreate -n logs-lv -L 14G webdata-vg

- Verify that your Logical Volume has been created successfully by running sudo lvs

- Verify the entire setup
sudo vgdisplay -v #view complete setup - VG, PV, and LV
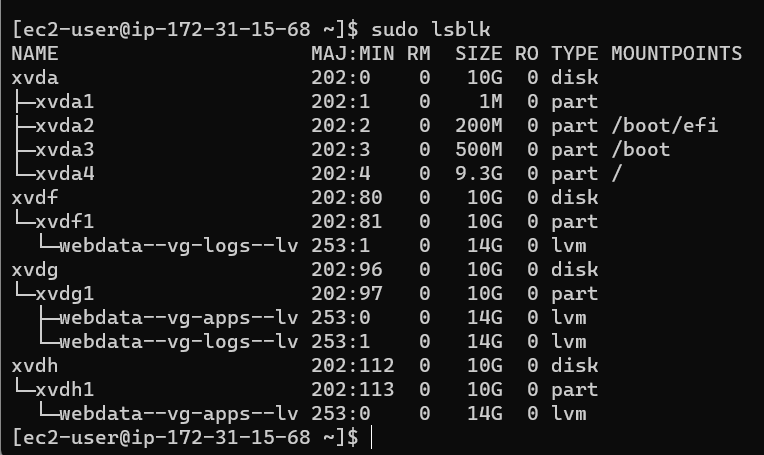
sudo lsblk
- Use mkfs.ext4 to format the logical volumes with ext4 filesystem
sudo mkfs -t ext4 /dev/webdata-vg/apps-lvsudo mkfs -t ext4 /dev/webdata-vg/logs-lv

- Create /var/www/html directory to store website files
sudo mkdir -p /var/www/html
Create /home/recovery/logs to store a backup of log data sudo mkdir -p /home/recovery/logs
Mount /var/www/html on apps-lv logical volume
sudo mount /dev/webdata-vg/apps-lv /var/www/html/Use rsync utility to back up all the files in the log directory /var/log into /home/recovery/logs (This is required before mounting the file system)
sudo rsync -av /var/log/. /home/recovery/logs/Mount /var/log on logs-lv logical volume.
Note All the existing data on /var/log will be deleted. That is why step 15 above is very important
sudo mount /dev/webdata-vg/logs-lv /var/log
Restore log files into /var/log directory
sudo rsync -av /home/recovery/logs/. /var/logUpdate
/etc/fstabfile so that the mount configuration will persist after restarting the server.
UPDATE THE /ETC/FSTAB FILE
The UUID of the device will be used to update the /etc/fstab file;sudo blkid

sudo vi /etc/fstab
Update /etc/fstab in this format using your UUID and remember to remove the leading and ending quotes.
Test the configuration and reload the daemon
sudo mount -a
sudo systemctl daemon-reloadVerify your setup by running df -h, output must look like this:
Step 2 - Prepare the Database Server
Launch a second RedHat EC2 instance that will have a role – ‘DB Server’
Repeat the same steps as for the Web Server, but instead of apps-lv create db-lv and mount it to /db directory instead of /var/www/html/.

Step 3 — Install WordPress on your Web Server EC2
Update the repository
sudo yum -y updateInstall wget, Apache and its dependencies
sudo yum -y install wget httpd php php-mysqlnd php-fpm php-jsonStart Apache
sudo systemctl enable httpd
sudo systemctl start httpdTo install PHP and its depemdencies
sudo yum install https://dl.fedoraproject.org/pub/epel/epel-release-latest-8.noarch.rpm
sudo yum install yum-utils http://rpms.remirepo.net/enterprise/remi-release-8.rpm
sudo yum module list php
sudo yum module reset php
sudo yum module enable php:remi-7.4
sudo yum install php php-opcache php-gd php-curl php-mysqlnd
sudo systemctl start php-fpm
sudo systemctl enable php-fpm
setsebool -P httpd_execmem 1
Restart Apache
sudo systemctl restart httpdDownload wordpress and copy wordpress to var/www/html
mkdir wordpress
cd wordpress
sudo wget http://wordpress.org/latest.tar.gz
sudo tar xzvf latest.tar.gz
sudo rm -rf latest.tar.gz
sudo cp wordpress/wp-config-sample.php wordpress/wp-config.php
sudo cp -R wordpress /var/www/html/
- Configure SELinux Policies
sudo chown -R apache:apache /var/www/html/wordpress
sudo chcon -t httpd_sys_rw_content_t /var/www/html/wordpress -R
sudo setsebool -P httpd_can_network_connect=1
sudo setsebool -P httpd_can_network_connect_db 1
Step 4 — Install MySQL on your DB Server EC2
sudo yum updatesudo yum install mysql-serverVerify that the service is up and running by using
sudo systemctl status mysqld, if it is not running, restart the service and enable it so it will be running even after reboot:
sudo systemctl restart mysqldsudo systemctl enable mysqld
Step 5 — Configure DB to work with WordPress
sudo mysql
CREATE DATABASE wordpress;
CREATE USERmyuser@<Web-Server-Private-IP-Address>IDENTIFIED BY 'mypass';
GRANT ALL ON wordpress.* TO 'myuser'@'';
FLUSH PRIVILEGES;
SHOW DATABASES;
exit
Step 6 — Configure WordPress to connect to the remote database
Hint: Do not forget to open MySQL port 3306 on DB Server EC2. For extra security, you shall allow access to the DB server ONLY from your Web Server’s IP address, so in the Inbound Rule configuration specify the source as /32

Install the MySQL client and test that you can connect from your Web Server to your DB server by using mysql−client.
sudo yum install mysql
sudo mysql -u admin -p -h <DB-Server-Private-IP-address>Verify if you can successfully execute SHOW DATABASES; command and see a list of existing databases.
Change permissions and configuration so Apache could use WordPress:
try to figure this part out, it might be a little challenging but will help you grow in your DevOps journeyEnable TCP port 80 in Inbound Rules configuration for your Web Server EC2 (enable from everywhere 0.0.0.0/0 or from your workstation’s IP)
Setup your credentials in your wp-config.php file.
restart httpd
sudo systemctl restart httpddisable the default page of apache so that you can view the wordpress page on the internet
sudo mv /etc/httpd/conf.d/welcome.conf /etc/httpd/conf.d/welcome.conf_backupRestart httpd
sudo systemctl restart httpdTry to access from your browser the link to your WordPress
http://<Web-Server-Public-IP-Address>/wordpress/
Setup your credentials

- Log into your account

Warning Do not forget to STOP your EC2 instances after completion of the project to avoid extra costs.
CONGRATULATIONS!!!
You have learned how to configure the Linux storage subsystem and have also deployed a full-scale Web Solution using WordPress CMS and MySQL RDBMS!