Client-server Architecture With Mysql
Understanding Client-Server Architecture

Technical Writer and certified AWS Solutions architect, with a background in DevOps. I enjoy learning about new concepts and simplifying their usage in documents.
Client-Server Architecture is a concept you will encounter in many areas of your IT journey. Client-Server refers to an architecture in which two or more computers are connected over a network to send and receive requests from one another. In their communication, each machine has its role: the machine sending requests is usually referred to as "Client" and the machine responding (serving) is called "Server".
A simple diagram of Web Client-Server architecture is presented below:


In the example above, a machine that is trying to access a Web site using a Web browser or simply ‘curl’ command is a client and it sends HTTP requests to a Web server (Apache, Nginx, IIS or any other) over the Internet. If we extend this concept further and add a Database Server to our architecture, we can get this picture:

In this case, our Web Server has the role of a "Client" that connects and reads/writes to/from a Database (DB) Server (MySQL, MongoDB, Oracle, SQL Server or any other), and the communication between them happens over a Local Network.
Note: It can also be an Internet connection, but it is a common practice to place the Web Server and DB Server close to each other in a local network.
The setup on the diagram above is a typical generic Web Stack architecture that you have already implemented in previous projects (LAMP, LEMP, MEAN, MERN), this architecture can be implemented with many other technologies (various Web and DB servers), from small Single-page applications to large and complex portals.
A real example of a LAMP website
In Project 1 you implemented a LAMP STACK website, let us take an example of a commercially deployed LAMP website – www .propitixhomes .com
This LAMP website server(s) can be located anywhere in the world and you can reach it also from any part of the globe over a global network. Assuming you type in www .propitixhomes .com on your browser, it means your browser is considered the "Client". It is sending requests to the remote server and is expecting a response from the remote server.
Let's take a very quick example and see Client-Server communication in action.
- Open up your Ubuntu or Windows terminal and run the curl command:
curl -Iv www.facebook.com
Note: If your Ubuntu does not have 'curl' you can install it by running
sudo apt install curl
In this example, your terminal will be the client, while www .facebook .com will be the server.
See the response from the remote server in the below output. You can also see that the requests from the URL are being served by a computer with an IP address 31.13.83.36 on port 80. More on IP addresses and ports when we get to Networking related projects

Another way to get a server’s IP address is to use a simple diagnostic tool like ‘ping’, it will also show round-trip time – the time for packets to go to and back from the server, this tool uses ICMP protocol.
Side Self Study
Read about ping and traceroute network diagnostic utilities. Be able to make sense of the results of using these tools.
Refresh your knowledge of basic SQL commands, and be able to perform simple SHOW, CREATE, DROP, SELECT and INSERT SQL queries.
IMPLEMENT A CLIENT SERVER ARCHITECTURE USING MYSQL DATABASE MANAGEMENT SYSTEM (DBMS).
TASK – Implement a Client-Server Architecture using MySQL Database Management System (DBMS).
To demonstrate a basic client-server using MySQL Relational Database Management System (RDBMS), follow the instructions below:
- Create and configure two Linux-based virtual servers (EC2 instances in AWS).
Server A name -
mysql_server
Server B name -mysql_client

- On mysql_server Linux Server install MySQL Server. Refer to project2 if you've forgotten how to do this.
Note: Ensure you create a remote user and grant it the required permissions.
- On the mysql_client Linux Server install MySQL Client software. This can be done by running the following code:
sudo apt update
sudo apt upgrade
sudo apt install mysql-client

Note: We want to be able to connect to the MySQL server on our mysql_server instance, from the mysql_client instance, so there's no need to install the MySQL server on the client instance. Just install the client software.
By default, both of your EC2 virtual servers are located in the same local virtual network, so they can communicate with each other using local IP addresses. Use mysql_server's local IP address to connect from mysql_client. MySQL server uses TCP port 3306 by default, so you will have to open it by creating a new entry in ‘Inbound rules’ in ‘mysql_server’ Security Groups. For extra security, do not allow all IP addresses to reach your ‘mysql_server’ – allow access only to the specific local IP address of your ‘mysql_client’.
You might need to configure mysql_server to allow connections from remote hosts.
sudo vi /etc/mysql/mysql.conf.d/mysqld.cnf
Replace ‘127.0.0.1’ to ‘0.0.0.0’ like this:

- From the mysql_client Linux Server connect remotely to the mysql_server Database Engine without using SSH. You must use the MySQL utility to perform this action.
Connect to mysql_server by running the following commandmysql -u username -h host/IP -p password
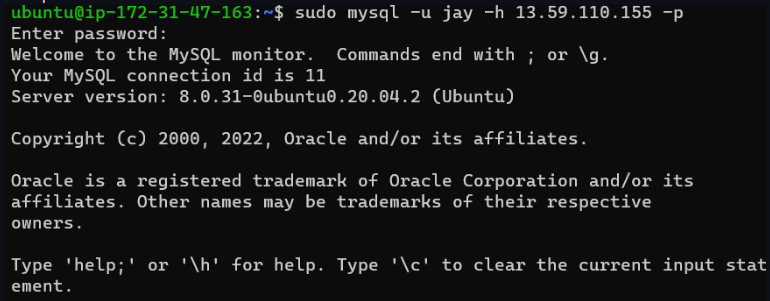
- Check that you have successfully connected to a remote MySQL server and can perform SQL queries:
Show databases;

If you see an output similar to the image below, then Congratulations you have completed this project – you have deployed a fully functional MySQL Client-Server setup.

Well Done! You are getting there gradually. You can further play around with this setup and practice creating/dropping databases & tables and inserting/selecting records to and from them.
THE END!!!


